Anchor Refit
Over the course of my long sailing career, I’ve spent nearly three decades living aboard boats ranging from 20 to 54 feet. While I can’t take credit for the invention of the anchor platform or the anchor roller, I probably owe to their innovative designers the survival of several boats. I have experience with many platforms that were extremely strong, safe, well designed and versatile. But I have also been a victim of some that were weak and impractical.
What makes a good platform? It must be built like a tank to withstand horrific conditions and massive loads, and designed to accommodate two or three anchors of different styles at the same time. Rollers are absolutely essential and must be far enough apart to avoid fouling each other as well as the forestay. The floor plan should be wide enough to provide good footing, even under rough conditions. A bow pulpit should encircle the entire platform if possible (and might even feature a bracket to accommodate yet another anchor such as a Danforth). Finally, the platform should complement the appearance of the boat, especially its sheer line.
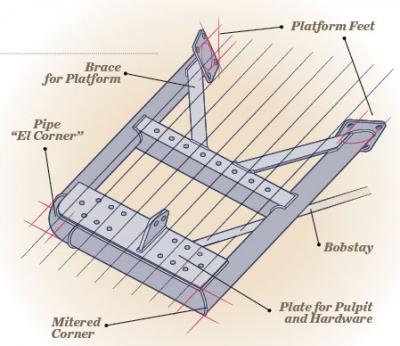
| |_**Metal Frame ** For extra strength and durability, consider adding a metal framework. Fabricated with 316 stainless steel, it should feature horizontal stainless-plate gussets for supporting the pulpit base and anchor rollers._| |
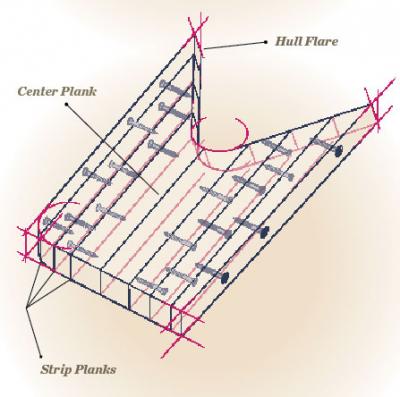
| |_**Strip Plank ** This method of construction makes use of longitudinal hardwood lengths that are twice as high as they are wide, glued together with paste epoxy and fastened together with flat-head screws, the length of which should be 2.5 times the plank width._| |
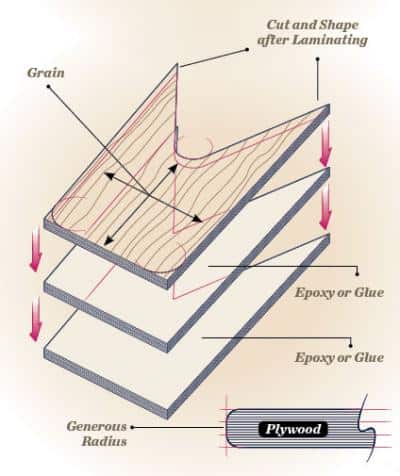
| |Multilayers When building with multiple layers of plywood, begin by transferring your platform pattern lines to several pieces of high-quality plywood. You can glue up all the layers at the same time provided the “kick” time of the glue is not less than 40 minutes. Use C-clamps around the platform edges and heavy objects like lead weights to compress the laminate during the curing process.|
So, how would one go about retrofitting an anchor platform to a boat that doesn’t have one? First, a lot of careful thought has to go into the hardware and layout. Consider the size and type of anchors to be used; chain size; where and how cleats and posts will be assembled on the foredeck; forestay clearance; stanchion bases; and the angle of the hull stem. All these elements must be integrated into an efficient design.
If your platform will incorporate a bowsprit, make sure that the anchor rode and chain have a fair lead from the platform’s forward end so that they won’t strike the bobstay. I once lost all of the starboard ground tackle aboard my schooner, At Last, when the rode chafed against the bobstay.
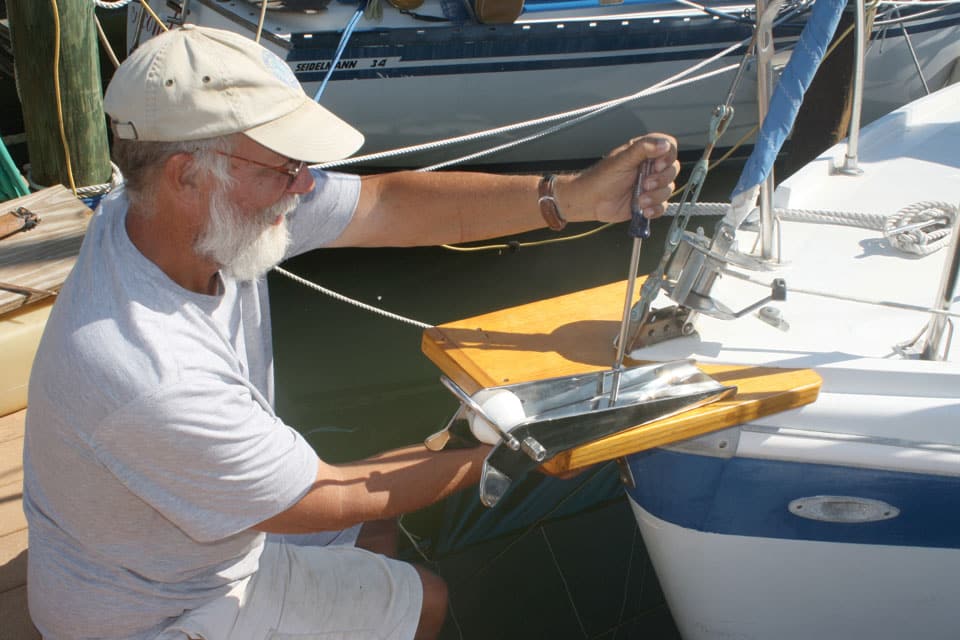
Regardless of a platform’s style or construction method, accurate patterns are the key to constructing a tight fit. I use a pattern technique taught to me by my dad, a lifelong boatbuilder, that employs the same mat board used for framing pictures; it’s stiff, dimensionally stable, and easy to cut with scissors and an X-Acto knife. Start with a series of three or four large pieces of mat board glued together to define the basic shape of the hull where the platform will be placed. I like Titebond III glue, which sets in about five minutes and cures in a couple of hours. The base pieces of the pattern can usually be taped to the hull while it’s being assembled. Don’t be concerned if it’s a loose fit, as we’ll address accuracy next.
Cut several dozen small pieces of mat board in about ½-by-2-inch sections, and then, to fine-tune for accuracy, cut one end of these pieces to a point. One by one, place a drop of glue on each “pointer” and position it onto the baseboard so it just makes contact with the hull. Repeat this process until the pointers completely surround the hull where the platform will be installed. Additional pointers should be used to define extraneous shapes such as a headstay tang.
It’s a wise idea to create your pattern so it includes the entire shape of the intended platform, so you can outline all of the hardware as well as the toerails and their fastenings. This step will become an invaluable guide for locating the plank edge joints and their screws, so longitudinal and transverse conflicts can be avoided.
For amateur construction, wood platforms without a metal frame are ideal. Even then, attaching the platform to the hull requires skill and presents an engineering challenge. The platform must fit the shape, as well as the angles, of the hull very accurately. Adding angular pieces of mat board above or below the pattern baseboards can help.
| Building a Platform for a Columbia 26 |
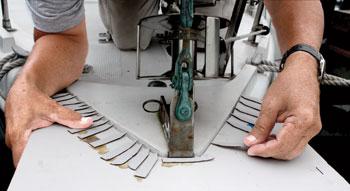
| |1. One by one, place a drop of glue on each pointer and position it on the baseboard so it just makes contact with the hull. Repeat the process until the pointers completely surround the hull where the platform will be installed.| |
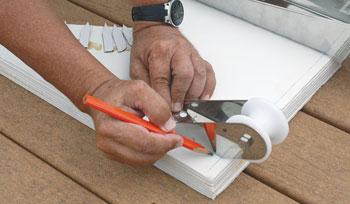
| |2. On the pattern, lay out and outline where all hardware and fittings will ultimately be added to the finished platform.| |
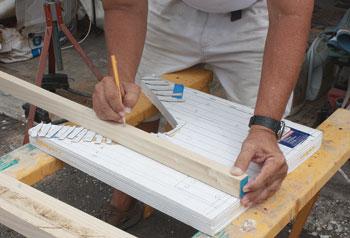
| |3. If opting for strip-plank construction, mark the platform plank cuts directly on the pattern. Begin with a center plank as wide as possible, building outward on each side with narrower strips.| |
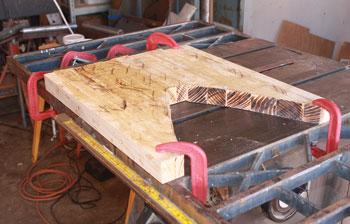
| |4. After the planks are glued and fastened, and have had time to properly cure, use a band saw to cut the final perimeter and hull-shape bevel. You may need to remove the outermost screws during the cutting and reinsert them when finished.| |
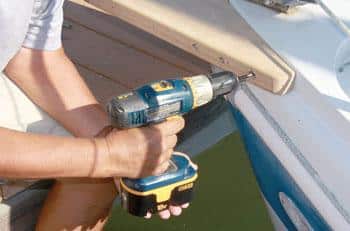
| |5. Before the platform is permanently installed with all fittings and hardware, pre-fasten it directly to the hull with stainless bolts, washers and lock nuts.| |
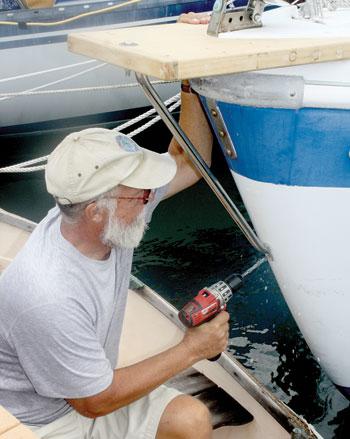
| |6. For added strength and rigidity, install a bobstay or diagonal compression strut to the platform, which will assist in bearing the ground-tackle loads when anchored in an open roadstead or bouncy seaway.|
The platform construction that I prefer can be strip-planked (epoxy glued and screwed horizontally with long screws), or built of multiple layers of marine ply with the grain of each layer rotated about 30 degrees to produce the greatest possible working strength. I don’t recommend tongue-and-groove, half-lap or edge-dowel construction because these techniques don’t hold up over the long haul. I also strongly warn against building the platform by edge-gluing thick planks and supplementing them by drilling through and inserting transverse threaded tie rods with countersunk washers and nuts. This method causes crosswise weakness and probable rot that invites total failure of the platform.
Strip-planked construction is made up of longitudinal hardwood lengths that are twice as high as they are wide, glued together with paste epoxy and fastened one to another by flat-head screws, the length of which are 2.5 times the plank width. Begin with a center plank as wide as possible, building outward on each side with the narrower strips. Continue until the structure is about an inch wider than the final shape. After the full curing cycle, cut the final perimeter and hull-shape bevel (best done with a band saw). You might have to remove the outermost screws during the cutting and reinsert them when finished.
For multilayered plywood construction, begin by transferring your platform pattern lines at 30-degree angles to several pieces of high-quality plywood (the exact number will depend on the desired thickness of the platform). Cut each piece at least one inch outside of the final cut line. You can glue up all the layers at the same time provided the “kick” time of the epoxy glue is not less than about 40 minutes. Use C-clamps around the platform edges and heavy objects such as bricks or lead dive weights to compress the laminate during the curing period. Wait a day before cutting the platform perimeter and the bevel of the hull shape (best cut with a band saw).
A wooden platform on a metal frame will require two construction disciplines: woodworking and metalworking. The metal parts should be designed by a mechanical or structural engineer and fabricated from tubular 316 stainless steel (round or square) by a professional welder. The “deck” of the platform can be built by the strip-planked or multilayered plywood method, or by fastening individual planks of any width to the frame’s transverse members. The stainless framework should feature horizontal stainless-plate gussets for supporting the pulpit base as well as the anchor rollers and possible chock installations.
Fasten the platform to the hull with stainless bolts, washers and lock nuts. The washers should be custom made by 1) cutting required bevels out of stainless pipe or thick-wall stainless tubing or 2) making beveled washers out of a solid material such as Seaboard or Starboard. Never pass a horizontal bolt through an angled hull side or bulwark without a beveled washer. A flat washer, when used, might require an elongated hole.
A diagonal compression strut should be a standard feature of every long-cantilevered platform that does not accept a head stay. Consider a boat anchored in a seaway with large breaking waves. As a wave begins to pass under the boat, the bow rises to the height of the wave, then the entire hull surges aft almost at the speed of the wave. This produces significant downward or forward loading on the platform, which will increase if the chain’s catenary straightens out.
My Cape Dory 28, Nikki, was once anchored in such conditions as I was getting under way. On one huge surge, a ⅜-inch stainless shackle virtually exploded, and a custom-made stainless plow anchor and all of the chain were lost. At that instant, I felt the boat lurch as if it had backed into a seawall. The platform strut, along with the forestay, absorbed the entire enormous shock load, sparing the platform and the foredeck any damage. The compression strut should be made of 316 stainless-steel heavy-wall tubing with metal plate fittings at each end to connect the platform’s underside to the hull stem.
A well-constructed anchor platform is functional and good-looking. It can increase your safety margins when anchoring, add a touch of class to your boat’s profile, and increase both the length and value of your boat. With a generous footprint, it can even be a convenient space when working forward to change headsails or douse a kite. If building a platform is beyond your skills or time allotment, find a good shipwright to make you one. You won’t regret the investment.
Yacht designer, author, illustrator and cruiser Bruce Bingham is based in Gulfport, Florida, where he lives aboard his Cape Dory 28, Nikki, and operates his boat-repair business, Bruce Does Boatwork. This article first appeared as “On Solid Footing” in the August 2013 issue of Cruising World.

