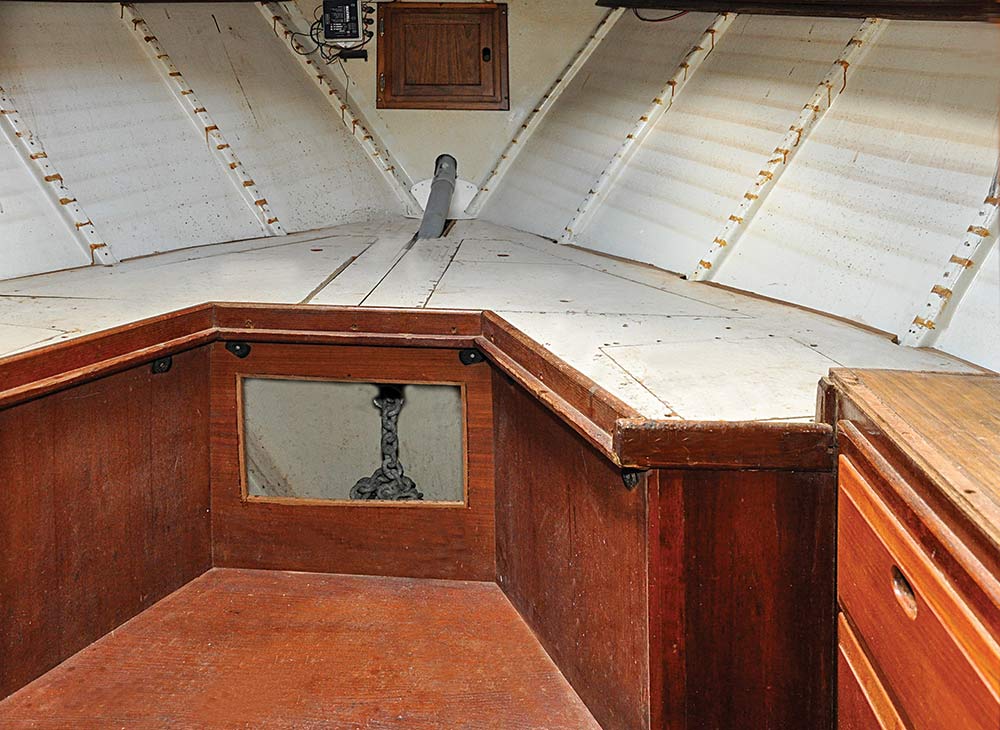
The chain locker in the forward-most part of the bow of my Down East 45 schooner, Britannia, was totally inadequate for the 250 feet of 3⁄8-inch chain that I considered a minimum for my 22-ton boat.
Every time we weighed anchor — even when only part of the rode had been laid — the chain always piled up in the locker and jammed the windlass. To allow the remainder to be wound in, someone had to then scramble over the forward cabin bunks, open the locker’s equally inadequate little door and push the pile of wet chain to one side. Sometimes this had to be done twice, and was very tiresome, especially when my wife and I were the only two crew aboard.
The chain would not self-stow because the locker was in the steep V-shaped section of the bow and the chain had no room to spread as it piled up. There was nothing that could be done to enlarge this space, but every time it happened, I swore I would somehow try to reroute the chain into one of the large compartments under the V-berth bunks. These were easily large enough to accommodate all the chain, and only used for storage of spare pipes and lines we hardly ever used.
If we could relocate the chain, there would be an additional advantage: 250 feet of 3⁄8-inch chain weighs about 420 pounds, so the farther aft the chain could be stowed, the lighter the weight on the bow. It is always better to keep weight on a boat’s extremities to a minimum (at both ends) to reduce pitching.
There were two large compartments under the forward cabin bunks, the aftermost one being the widest and deepest; it was 33 inches deep and 21 inches fore-and-aft, and spanned the width of the hull. The question was how to direct the chain into one of these compartments. The larger one also had a solid fiberglass floor, which would be ideal for a chain locker because the chain could spread better on the flat surface, unlike the V-shape of the bow.
I considered how to redirect the chain into this larger space, which is 4 feet farther aft from the existing chain locker and directly under the bunks when the filler board and cushion are in. I couldn’t run a tube directly from the navel pipe into the new locker because it would pass straight through the middle of the forward double berth.
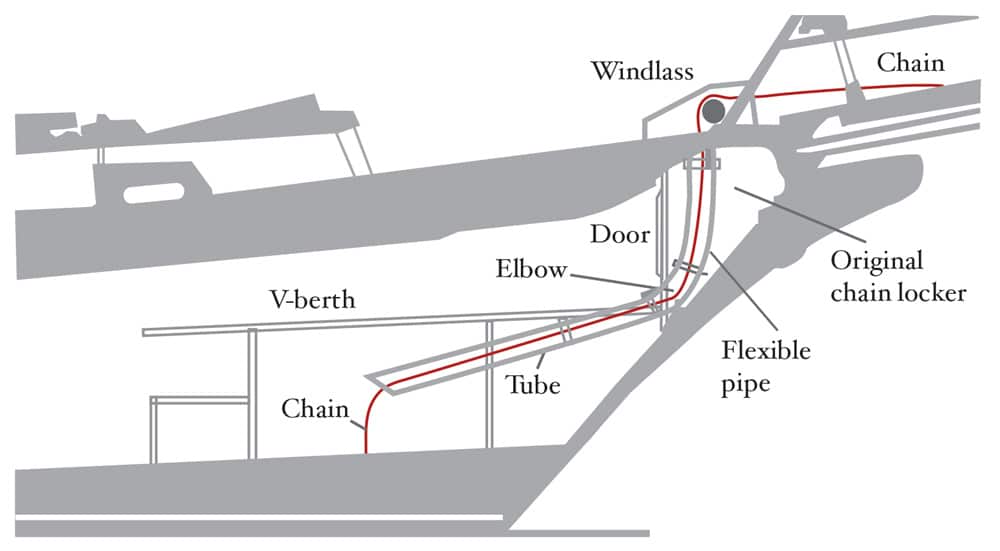
Previously, when I installed a new Maxwell electric windlass to replace the old manually operated one, I positioned it on top of the bowsprit. The chain then ran smoothly from the bow roller, around the windlass wildcat (also known as a gypsy) and down through the navel pipe into the chain locker.
The only possible route for the chain was down through the existing locker, around an almost 90-degree curve and through a tube under the bunks. But would it then continuously feed under its own weight?
I decided to experiment using some 2-inch-diameter plastic conduit pipe that is normally used to carry electrical wires. I bought this from our local Lowe’s hardware store for about $10, including a 90-degree elbow. It is amazingly strong stuff, with a wall thickness in excess of 1⁄8 inch, and very rigid when connected together.
Because it was a near-vertical drop, the chain easily rolled off the wildcat and down into the original chain locker. However, to get it into my new locker it then needed to pass through the curved pipe and travel a further 45 inches along a tube to finally fall into the center of the new compartment. The long tube would therefore need to be angled downward enough to help overcome friction as the chain slid along it, and it would need to have a deep enough fall at the end for the weight to haul the rest of the chain in a continuous, automatic feed. I had no idea what sort of slope would be needed, or how much fall the chain needed to continuously drag itself through this pipework. Nor could I experiment with the angle of the pipes in the actual locker because the 2-inch- diameter tube had to pass through a bulkhead between the two compartments, and I didn’t know where to drill the large hole.
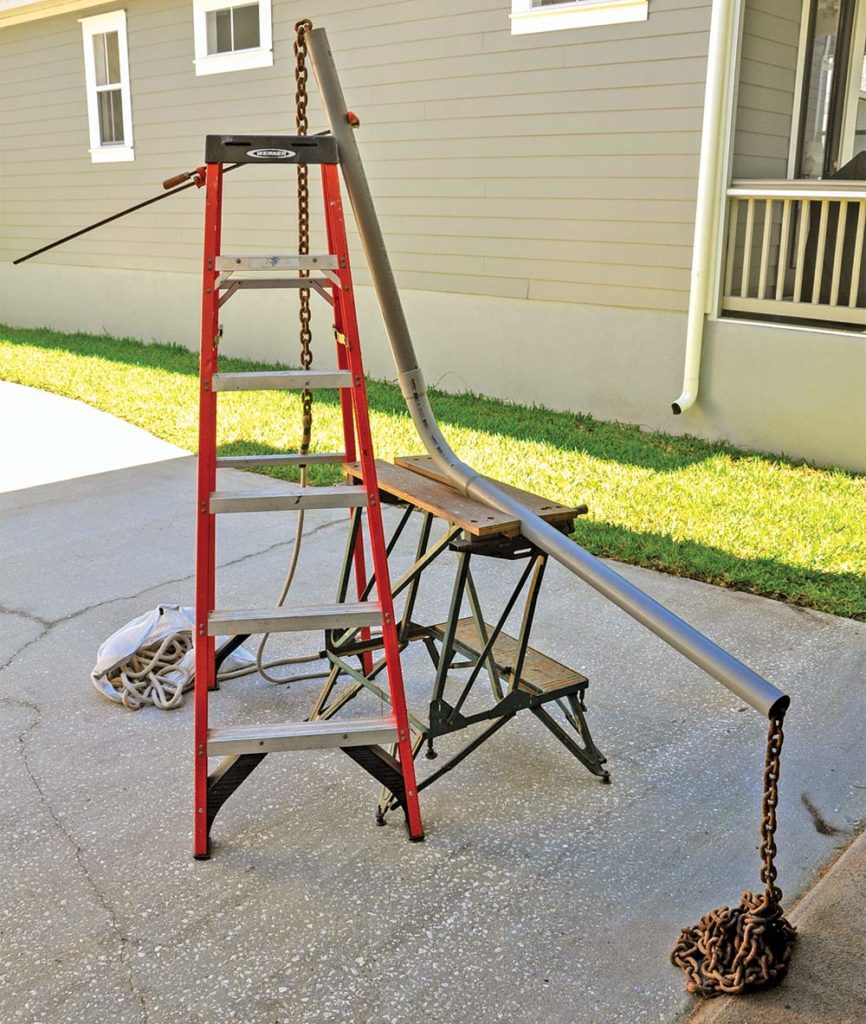
There was only one way I could think of to determine a suitable angle. I assembled a crude mock-up, using my workbench and a stepladder to hold the tubes. The down pipe, which would pass through the old locker, was 34 inches long; the pipe to carry the chain into the center of the new compartment was 45 inches long. It all looked somewhat amateurish, but it gave me an idea of what sort of angle was needed. I used 50 feet of 3⁄8-inch chain and fed it through the tubes; after a bit of adjustment, I found a minimum slope of approximately 10 degrees allowed the chain to run continuously as I fed it into the top pipe. I took measurements and transferred them to determine where the hole needed to be cut in the bulkhead between the two compartments.
Before I could install anything, I had to haul all the chain off the boat and pile it up on the marina dock to give me a clear working space.
Luckily, the plywood base of the bunks had only been screwed to the beam structure underneath, so I removed the complete starboard-side section, which gave me much more space to work in. I marked where the hole needed to be in the intervening bulkhead and cut a hole using a 2½-inch hole saw. I also had to greatly enlarge the tiny drain hole in the bottom of the original chain locker to be able to position the 2-inch-diameter curved pipe. I didn’t want this to show above the 6-inch bed cushion, so I kept it at 5 inches above the bed boards.
I found it impossible to use solid pipe to connect the navel pipe on deck to the curved tubing below because the angles were completely misaligned. I therefore bought a length of flexible truck fuel-hose tubing from a NAPA auto-parts store, which was just right, with a 2-inch internal diameter. I was able to join it directly to the 2-inch round flange on the navel pipe using a hose clamp, then clamped the other end to the conduit elbow at the bottom of the locker. This gave the chain a perfect lead into the conduit elbow.
When it was all finally assembled, I had a continuous, waterproof tube all the way from the deck, straight through the old locker, around the curve and along the pipe into my new chain locker. The total length was 86 inches.
Having installed all the tubing, I still couldn’t be absolutely certain if all this effort would actually eliminate the banking-up problem. I had used only a small length of chain in my simulation, but as it piled up in the locker, the distance it had to fall would reduce. So, the question was, would the fall still be enough for the chain to continue to self-feed right to the last link? There was only one way to find out.
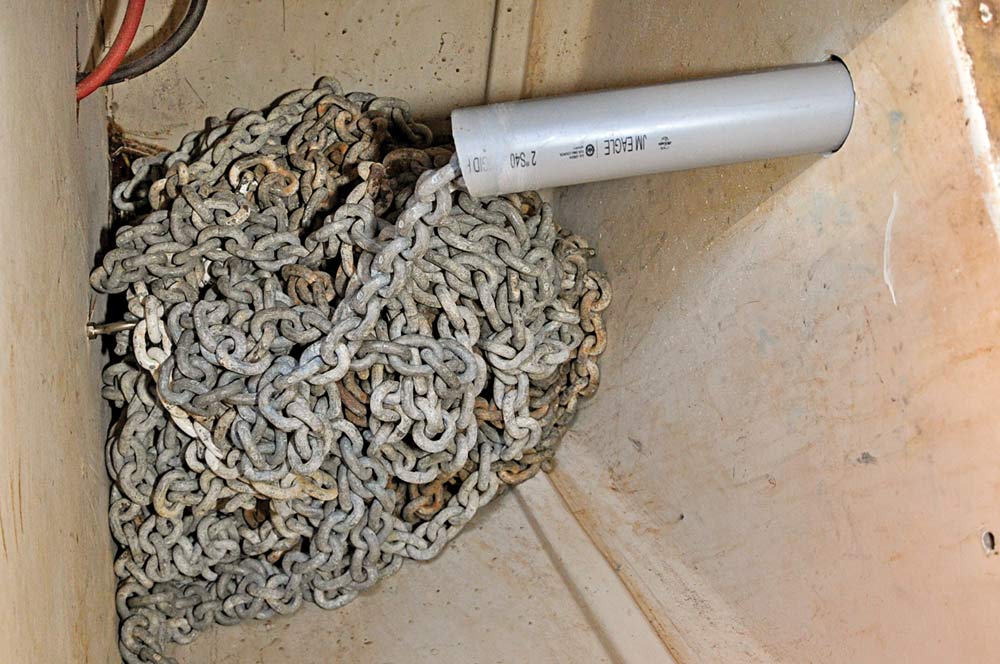
As I assembled the pipework, I ran a ¼-inch rope inside to enable me to pull the first links of chain through the tubes. I passed this line over the windlass wildcat and tied it to the first link, then easily pulled the chain through the complete tube and shackled it to a hefty eye-bolt, which I bolted through the locker bulkhead. The maximum fall, from the end of the pipe to the bottom of the new locker, was 27 inches, and the chain landed right in the center of the locker.
The base of the new chain compartment was much bigger than in the bow, and also flat. I hoped this would allow the chain to disperse itself into a larger pile. Happily, this proved to be the case, because all the chain ran into the new locker on its own — every last link!
I fancied I even saw a little smile from the windlass, which would no longer have its teeth almost pulled out every time the chain jammed.
In the original layout, seawater coming in on the chain, which can be quite substantial, especially with a full-length rode, drained into the bilge. The boat manufacturers had put two drain holes in the bottom of the flat compartment floor, which drained into the bilge channel also.
I was confident this redirecting exercise had solved the vexing problem, but you never know on boats. Murphy is always just around the corner.
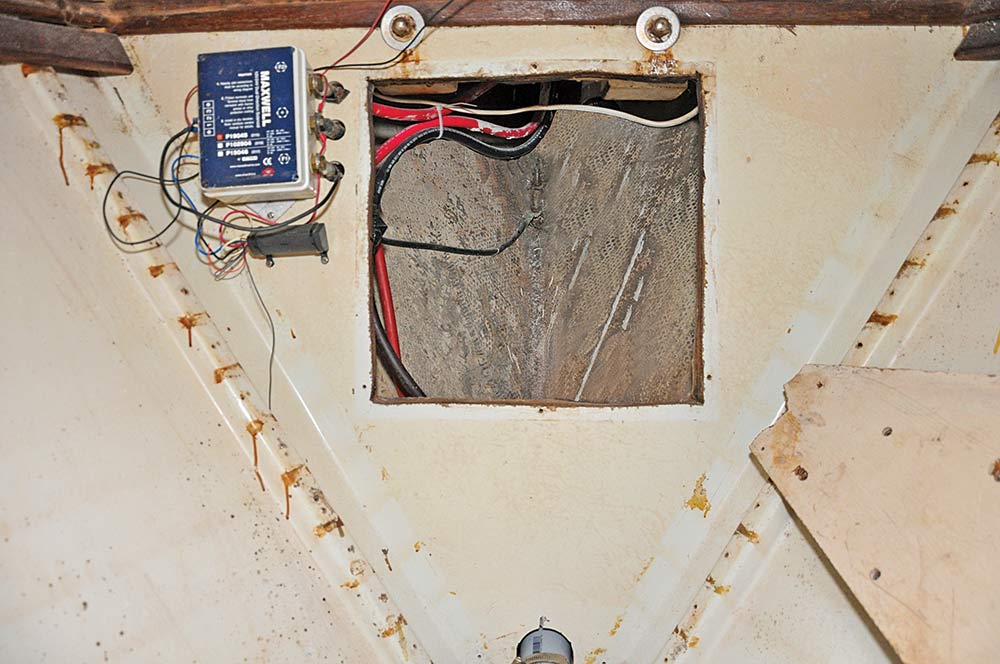
If, just to be awkward, the chain ever jammed up again, the only way to knock the pile over would be to move the bulky berth cushion, with all the sheets, covers and pillows, lift the locker door and reach down into the deep space. I could see this would actually be more of a nuisance than before. I therefore had a plan to be able to get to the chain pile easily and quickly. The rear of the new compartment formed the back of a seat between the V-berths. I cut a large aperture in this panel, which offered immediate access to the chain compartment without having to disturb the bunks. This also did not need a door, because the seat-back cushion and berth above covered it up. It just needed trim around the edges.
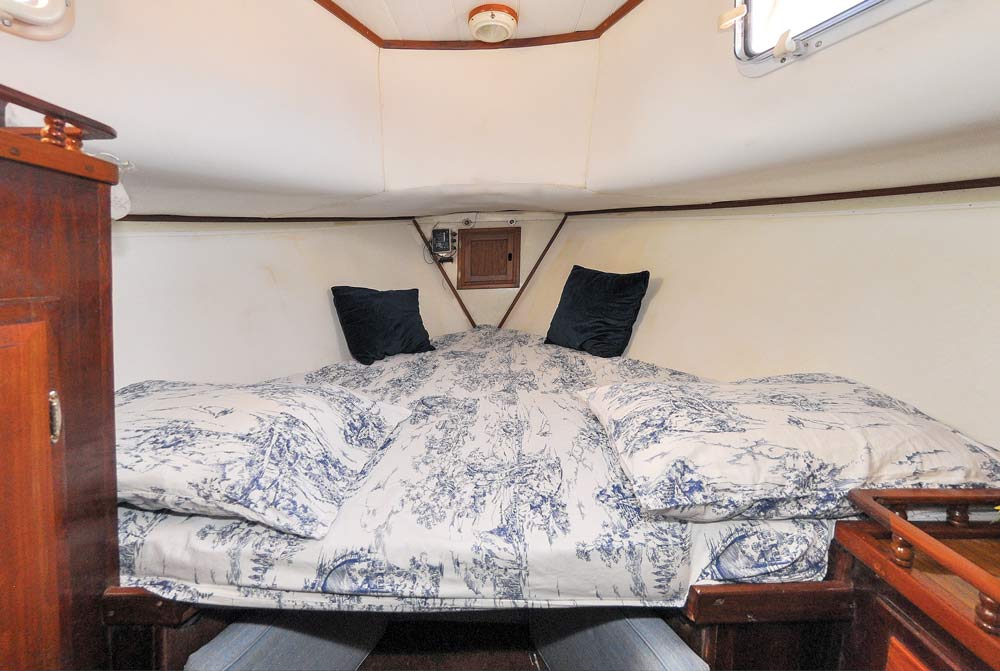
Britannia now has a totally self-feeding anchor-chain system, which hasn’t failed so far, even on the rare occasions I have anchored using all 250 feet of the rode.
I did receive a complaint from the first guests who used the forward berth: They said it sounded like an earthquake as we weighed anchor one morning. But I didn’t pay much heed; they should have been up as we got underway anyway.
On the plus side, Britannia‘s bow came up about an inch, due to shifting the heavy chain farther aft.
Does your boat have an inadequate chain locker that won’t accept all your chain without having to knock the pile over? If you can manage to fix it, it will come as a wonderful relief every time you weigh anchor and all the chain mysteriously disappears below.
Suppliers and Cost
| Materials: | Suppliers: | Cost: |
|---|---|---|
| 2-inch-diameter pipe and curved bend | Lowe’s | $10 |
| 2 1/2-inch hole cutter | Lowe’s | $12 |
| Two 2 1/2-inch-diameter pipe clamps | Lowe’s | $7 |
| 2-inch flexible tube for navel pipe | NAPA | $17 |
TOTAL: $46
Do-it-yourself sailor Roger Hughes is a frequent contributor to Cruising World.

